Burp suite is one application that is gaining loads of reviews in the IT industry. Some for the right reasons as it is great at supporting ethical hacking processes. As a result, web testing can be done to beef up security.
But as a note of warning, it should not be used for illegal or unauthorized penetration into sites and applications. Something as little as a Facebook login can be compromised using this tool.
Here in the software category of the Login Problems website, we will discuss how you can log in password with the Burp Suite professional and community edition. So, tag along as we fill you in on how to get this done.
The Concept behind Burp Suite
As a top-rated software suite in the ethical hacking field, Burp consists of a long list of tools that make web testing and ethical hacking a possibility. The brains behind this web security tool have created it to intercept activities between the browser and the web server.
At the point of interception, the user can request changes in several ways and re-configure data. This includes altering and bypassing the username and password to suit the user’s intent. This is why the Burp suite is not an ideal tool in the hands of the wrong user.
This can lead to vulnerabilities as the intruder can select options that can attack the system. This is not for the sake of ethical hacking and beefing up security. Rather, for the sake of compromising the web or application in question.
Considering the set of tools that the Burp suite brings to the table and how effective they are for web and application security, we should be open to using this enterprise suite. So, download it and start making good use of it. Now that we have filled you in on this, let’s get into the real business of explaining how to login passwords with burp suite professional and community edition.
Brute-Forcing the Login Setup with Burp Intruder
For starters, various attack forms are possible with Burp Intruder. How easy the process will be is determined by the option you select. It is against this backdrop that the attack option known as cluster bomb is recommended, among other possibilities.
With independent payload sets corresponding with defined positions, cluster bomb engages many payload sets. As a result, the number of (defined) payloads exponentially increases. This is as determined by the measure of generated requests. To perform a cluster bomb for brute-forcing a login setup, here are the required sets below:
Open Your Burp Browser
This might require logging into the PortSwigger account that you have. By and large, you’ll have to open the web test application’s browser and access the designated URL – https://portswigger.net/web-security/authentication/password-based/lab-username-enumeration-via-different-responses.
Login Request Interception
Once you get to the lab section, you head to your login page. You will do this the moment you click “My Account”. Afterward, ensure that some samples are entered into the Username & Password fields. The aim is so that subsequent identification will be easy. The next thing to do is to hit the “Log in” button.
Once you get entry into the Burp Suite, you will see many tabs. You are to head right to the “Proxy” tab. This is right after the “Dashboard” and “Target” tabs. Right under it, the “HTTP History” tab is what you should click. In the URL column, you should see an option with the “/login” option.

Forwarding of Intercepted Request
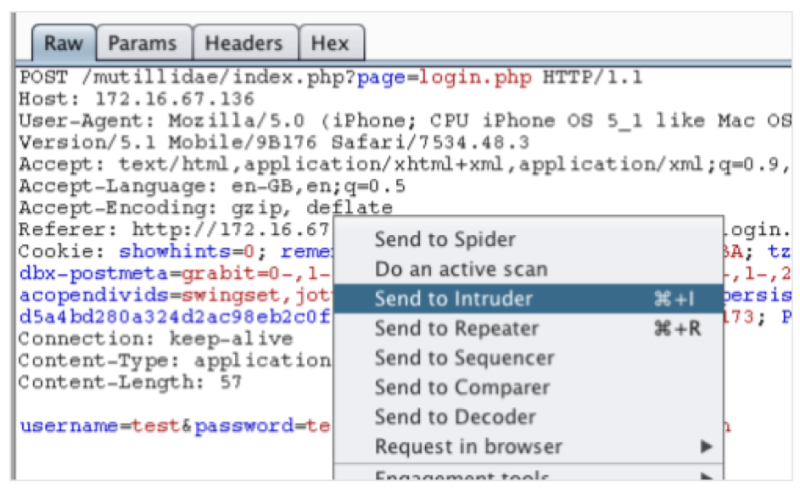
Once you identify the row under the URL column that reads “/login”, then you should right-click on it. You will see a list of options but you should choose “send to intruder”. This should be right after the “Do Active Scan or scanner” option.
This action implies that the burp intruder has gotten your request. As a result, the set will generate several payload positions.
Configuration of Payload Positions
You have to select “clear §”. This will ensure that all positions are cleared as payload positions for only the username & password are required. For the field tagged username, you should select input data. Afterward, click the “Add §” option. This would signify that it is a payload position. The same process applies to your password field.
Configuration and Launching of Cluster Bomb Attack
Choose “cluster bomb” from the “attack type” options. Afterward, click the tab tagged “payloads”. Under the (simple list) payload options, have the candidate usernames filled into this box. Next, have the payload set changed to “2”. Afterward, hit the button tagged “start attack”.
Analysis of Attack Results
You will need to be patient as the “start attack” request is playing out. The version of the burp suite community edition that you use determines how fast or slow it takes to get the result.
Next, you are to get the HTTP status code response list. This would happen as you click the “status” column’s header. You may be required to perform this action more than just once.
Watch out for the status column. Most of the rows should have a status code that reads “200”. However, there will be one that reads “302”. Check the preceding columns of this row and there you have the right login details – Details on the “payload 1” column as the username, while the details on “payload 2” as the password.
However, make sure the “Intercept is off” in the “proxy” tab. Input these details as you return to the login page and that should help you get through.
You stand a good chance of fixing issues seamlessly with contents from Login Problems. For example, you can find out how to solve Nectar connection problems.
 Login Problems Fix login issues on websites


